
In Mobile App Development
Learn to make an Android App In 8 Minutes! - read the full article about android app development 2022, Mobile App Development and Native and cross-platform solutions from Cody on Qualified.One

Professional Engineer
Typing - Learn to build an app 11 hours Ok that could be daunting But I can help May be a little I Hope - Crossed fingers Ok 1st we need to choose the language-kotlinand sdk Great You can download Android studio from developer.android.com And lets create a new project Lets start with an Empty Activity - Which is nothing but like an empty ground that feels like graveyard Give it a NiceName - NiceName Choose Kotlin as the language And click create Loading loading - an eternity later And once the setup is done you are ready to build your first app 1.
On the left we have the projects window which will have all your files the resources folder will have your media you want to use , and I will paste few tasty images into the drawables folder for later use ...
you will need 2 important things to make a functional app the frontend and the backend the frontend is the UI which you can actually see and interact and the backend is the functional part , the source code Both of these combined make an Activity and you will need something to visually see the changes just like live server for web development , here we have something called emulator which you can find on the top , lets try running it ...
Cool..
But what are we going to build ? Hmm....
Drinking Coffee ...
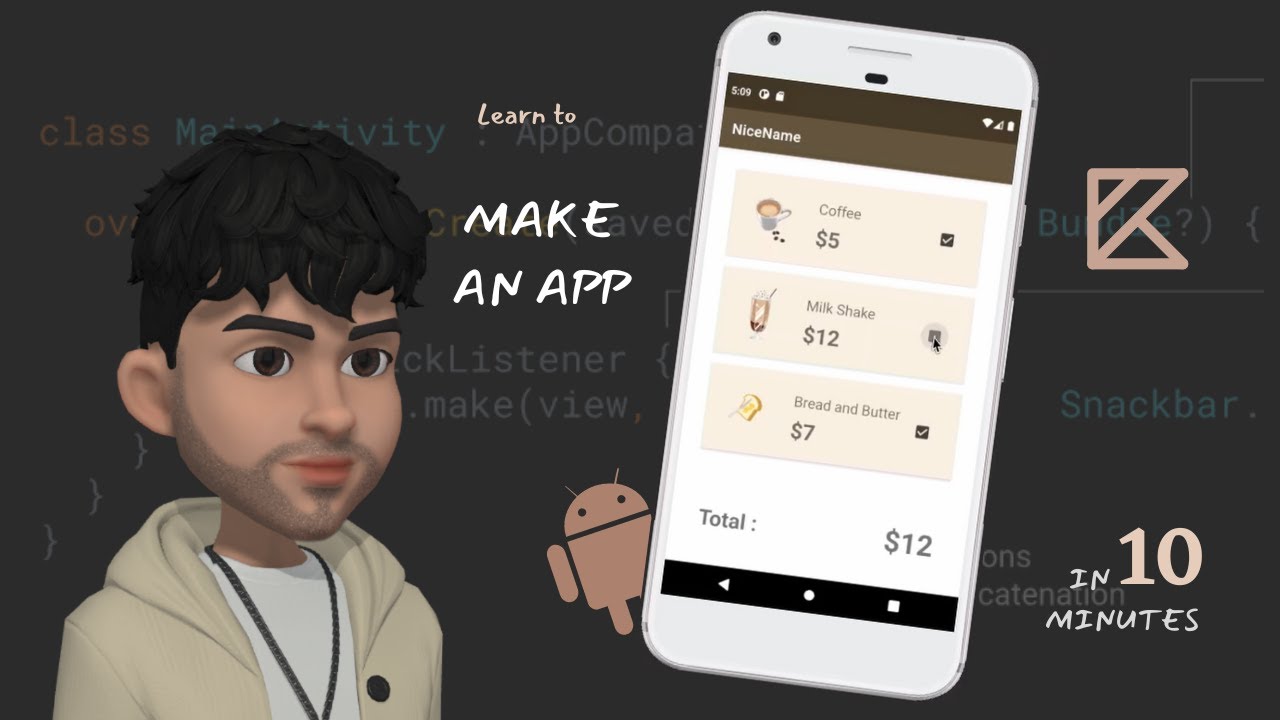
Aha A Coffee App This is the theme We will have an app that displays a list of Caffine products which we can add to cart and it will display the total amount of our purchase Lets start with designing the app first Go to the layouts , activity main We have 2 essential things to build our UI 1.
Widgets or views are the UI components such as buttons , texts 2.
Layouts or viewgroups which are essentially the containers that control how these widgets are positioned , one common layout is constraint layout where the widgets positions are defined based on the siblings position You can set your UI either using Drag and Drop and the properties tab or by writing XML and setting attributes through code yourself And you can see your preview in the Design area and the structure in the BluePrint area Now I am going to use XML as I found it much easier Lets see our beautiful design We have these cards that have the seperate items Lets first add them We already have a constraint layout and within this we are going to add a card view type card view and you can find that here there are 2 mandatory things we need to define : width and height you can either give it specified values like 100 dp or use values like match_parent which takes the whole value as the parent or wrap content which only takes the space it needs Lets give values as 350 and 120 But the card doesnt seem happy, he is red but why as you can see views inside the constraint layout doesnt know where to be placed So we need to constraint them lets connect the left to the left by clicking on these big dots, right to the right and top to the top hmmm... lets give our card a nice background color to make him stand out Noice Lets see our design again We have our card now we need items within it It has an image of the product , price and a checkbox to add it to cart Lets add them all now Before adding all these views we are defining another constraint layout that would help us hold these views within it Give it match parent to fill our card view Now time to add our widgets First an image view as usual give it a width and height , I gave both 80dp and provided it a source image from our drawables file ,now he is angry lets constraint it Second the price , for this we are going to use text view , we can provide wrap content as the width and height , you can use text , textsize and textstyle attributes to change their stylings , again an angry guy constraint them Finally the checkbox , the usual drill And finally we use another text box outside our card view to display our total price , give a default value of $0 Thats it we are done with our design Uff....
Lets try running it through our emulator by pressing this run and hope nothing crashes and humiliate me ......... Vola As you can see its displaying what we created [checkbox click click] Andy : dumb your app isnt working Yes because we havent implemented the logic Lets do that too now and shut him up This is all the UI part To make it a functionable app we need to write the code We do this in the java/package/Activity.kt file We already have some premade code All this does is renders the specified layout on creation of this activity What we want to do is whenever the checkbox is clicked we need to update our total price lets define our initial total price as 0 in Kotlin we use val to define variables that are non mutable and var to define those that are mutable here total is mutable so we use var we need to get the reference to our checkbox one way to do that is by using findviewbyid and get the view by its id so lets give a id to our checkbox and use it here and we need to detect each time the checkbox value is changed that can be done with setoncheckedchangelistener [breath..] buttonview is the call back , here we are not using it so so we can use underscore for it and ischecked has the value whether it is checked or not so if the checkbox is checked then do this or else do this do what ? lets see that if checked we need to get the value of the price and add it to the total so first assign a id to this price and define it as cost using find view by id so we can reference its value now lets calculate the total total += the price value that is cost.text is to get the value , .tostring is to convert it to string and to do the calculation we dont want the dollar sign so to remove it we do remove Prefix ("$") and finally convert it into Integer By doing this we will get int 5 in this case and in else condition do minus And still one more step to go display the total calculated value give a id to the textview , reference it and assign its text to "$" total.tostring to convert it to string Are you guys ready ? Run Now lets click the checkbox Huhuuuu It works And I had added few more cards and styling to show you how it works with them too..
You can try it on your own Still there are many concepts but this tutorial could have given you basic insight into Android Studio Emulator View Groups Views Constraint Layouts Different Widgets Positioning them variables Ids Referencing them and calculating values Hey ! Why doesnt my Emulator Start What , How much RAM do you have ? 2GB DDR3 O-O O-O
Cody: Learn to make an Android App In 8 Minutes! - Mobile App Development