
In Managed IT
In this guide, you have created a container for PHP-FPM and Nginx services so that you can manage them independently

Management

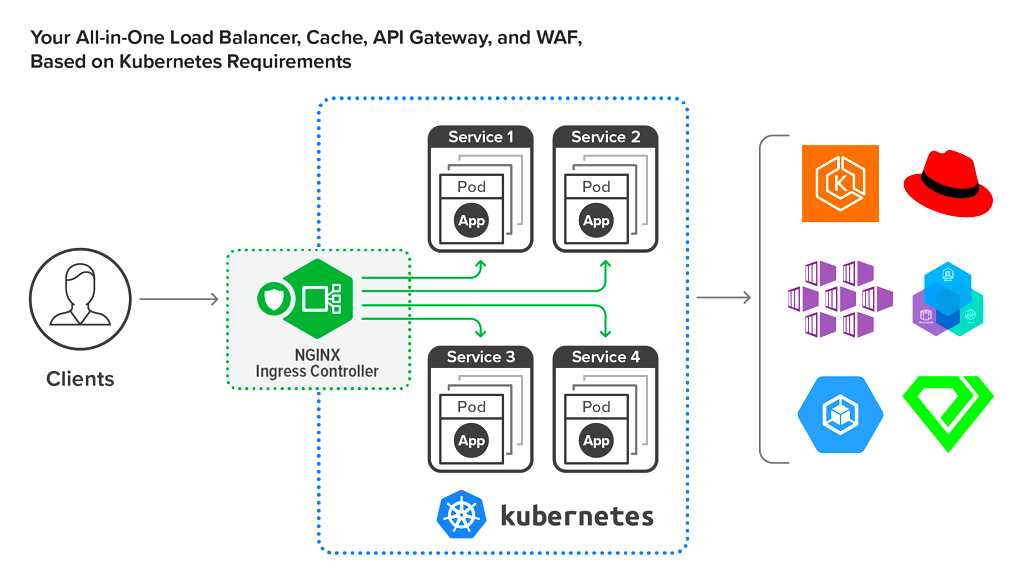
Kubernetes is an open-source system designed for orchestrating containers. It allows you to create, update and scale containers without worrying about forced downtime. Nginx acts as a proxy for PHP-FPM to run PHP applications. Containering this system in a single container can be cumbersome, but Kubernetes helps you organise the management of both services in separate containers. Using Kubernetes allows you to arrange for multiple uses of your containers and switching between them, and you don't have to rebuild a container image each time a new version of Nginx or PHP is released.
In this tutorial, you will deploy a PHP 7 application in a Kubernetes cluster using Nginx and PHP-FPM running in separate containers. You will also learn how to store your configuration files and application code outside of the container image, using DigitalOcean's block storage system. This approach allows you to reuse an Nginx image for any application that needs a web or proxy server, passing only the configuration volume without having to reassemble the image.
Prerequisites
- A basic understanding of Kubernetes objects. Read our Introduction to Kubernetes article for more information.
- Kubernetes cluster running on Ubuntu 16.04 You can perform this setup using the Creating a Kubernetes 1.10 cluster using Kubeadm guide on Ubuntu 16.04.
- DigitalOcean account and API access token with read and write permissions to create our storage volume. If you don't have an API access token, you can create one here.
- Your application code hosted on a publicly available URL, such as Github.
Step 1 - Create PHP-FPM and Nginx services
In this step you will create the PHP-FPM and Nginx services. The service allows access to a set of pods within a cluster. The services within the cluster can communicate directly using only names without the need for IP addresses. The PHP-FPM service allows access to the PHP-FPM pods and the Nginx service allows access to the Nginx pods.
Since the Nginx pods will proxy the PHP-FPM pods, you need to show the service how to find them. Instead of IP addresses, you will be able to take advantage of the Kubernetes automatic discovery service to use human-readable names to redirect requests to the appropriate service.
To create a service, you will create an object definition file. Each Kubernetes object definition is a YAML file containing at least the following elements:
- apiVersion: the version of the Kubernetes API to which the definition belongs.
- kind: the Kubernetes object that represents this file. For example, pod or service.
- metadata: this contains the name of the object along with labels that you may want to apply to the object.
- spec: this element contains the specific configuration depending on the kind of object being created, e.g. the container image or the ports through which the container will be accessible.
First, we'll create a directory to store the Kubernetes object definitions.
Connect via SSH to your main host and create a definitions directory where the Kubernetes object definitions will be stored.
mkdir definitionsNavigate to the newly created definitions directory:
cd definitionsCreate the PHP-FPM service by creating a php_service.yaml file:
nano php_service.yamlSet the Service value of the kind parameter to indicate that this object is a service:
...
apiVersion: v1
kind: Service
Name the php service as it will provide access to PHP-FPM:
...
metadata:
  name: php
You will be logically grouping different objects together using labels. In this tutorial, you will use tags to group objects into levels, like frontend or backend. PHP pods will run in the background of the service, so you can label this as follows: tier: backend.
...
  labels:
    tier: backend
The service determines which pods to connect using the selector tags. The pod corresponding to these labels will be served regardless of whether the pod was created before or after the service. Later in this guide you will learn how to add tags for your pods.
Use the tag tier: backend to bind the pod to the backend tier. Then you should add an app: php tag to indicate that this sub runs PHP. Add these two tags after the metadata section.
...
spec:
  selector:
    app: php
    tier: backend
Next, specify the port used to access this service. In this tutorial you will be using port 9000. Add it to the php_service.yaml file under the spec section:
...
  ports:
    - protocol: TCP
      port: 9000
Your finished php_service.yaml file will look like this
apiVersion: v1
kind: Service
metadata:
  name: php
  labels:
    tier: backend
spec:
  selector:
    app: php
    tier: backend
  ports:
  - protocol: TCP
    port: 9000
Press CTRL + o to save the file, then CTRL + x to exit the nano editor.
Now that you have created an object definition for the service, you will use the kubectl apply command with the -f argument and specifying the php_service.yaml file to start the service.
Create the service:
kubectl apply -f php_service.yaml
This output confirms that the service has been created:
Output
service/php created
Verify that the service is running:
kubectl get svc
You will see that the PHP-FPM service is running:
Output
NAME         TYPE        CLUSTER-IP      EXTERNAL-IP   PORT(S)    AGE
kubernetes   ClusterIP   10.96.0.1               443/TCP    10m
php          ClusterIP   10.100.59.238           9000/TCP   5m
There are different service types supported by Kubernetes. Your php service uses the default service type, ClusterIP. This service type assigns an internal IP address and makes the service available only within the cluster.
Now that the PHP-FPM service is ready, we will move on to creating the Nginx service. Create and open a new nginx_service.yaml file with the editor:
nano nginx_service.yaml
This service will affect the Nginx pods, so you will have to name it nginx. Then you will need to add a tag tier: backend, because it belongs to the backend tier.
apiVersion: v1
kind: Service
metadata:
  name: nginx
  labels:
    tier: backend
As in the case of the php service, set up a selector service - app: nginx and tier: backend. Make this service available on port 80, the default HTTP port.
...
spec:
  selector:
    app: nginx
    tier: backend
  ports:
  - protocol: TCP
    port: 80
The Nginx service will be accessible from the Internet using your public IP address. Under spec.externalIPs add:
...
spec:
  externalIPs:
  - your_public_ip
Your nginx_service.yaml file will look like this
apiVersion: v1
kind: Service
metadata:
  name: nginx
  labels:
    tier: backend
spec:
  selector:
    app: nginx
    tier: backend
  ports:
  - protocol: TCP
    port: 80
  externalIPs:
  - your_public_ip
Save and close the file. Create the Nginx service:
kubectl apply -f nginx_service.yaml
After starting the service, you will see the following output:
Output
service/nginx created
You can do the following to view all running services:
kubectl get svc
You will see the PHP-FPM and Nginx services presented as a result of running the command:
Output
NAME         TYPE        CLUSTER-IP      EXTERNAL-IP   PORT(S)    AGE
kubernetes   ClusterIP   10.96.0.1               443/TCP    13m
nginx        ClusterIP   10.102.160.47   your_public_ip 80/TCP     50s
php          ClusterIP   10.100.59.238           9000/TCP   8m
Note that you can use the following command to remove the service:
kubectl delete svc/service_name
Now that you have created the PHP-FPM and Nginx services, you need to specify where you will store your application code and configuration files.
Step 2 - Install the DigitalOcean storage plugin
Kubernetes provides various storage plugins that allow you to create storage space for your environment. In this step, you will be installing the DigitalOcean storage plugin to create block storage in DigitalOcean. Once the installation is complete, a storage class called do-block-storage will be added, which you will use to create block storage.
First you will need to configure a Secret type object for Kubernetes to store the DigitalOcean API token. Secret objects are used to exchange sensitive information, such as SSH keys and passwords, with other Kubernetes objects in the same namespace. Namespaces provide a way to logically separate your Kubernetes objects.
Open the secret.yaml file in the editor:
nano secret.yaml
Name your Secret digitalocean type object and add it to the kube-system namespace. The kube-system namespace is the default namespace for internal Kubernetes services, which is also used in the DigitalOcean storage plugin to run various components.
apiVersion: v1
kind: Secret
metadata:
  name: digitalocean
  namespace: kube-system
Instead of the spec key, the Secret object uses the data or stringData key to store the required information. The data parameter stores base64-encoded data, which is automatically decrypted when received. The stringData parameter stores unencrypted data, which is automatically encoded during creation or update, and does not output data when a Secret object is received. For convenience, you will use stringData within this manual.
Add an access-token as stringData:
...
stringData:
  access-token: your-api-token
Save and close the file.
Your secret.yaml file will look like this:
...
stringData:
  access-token: your-api-token
Create an object of type Secret:
kubectl apply -f secret.yaml
You will see the following result when you create a Secret object:
Output
secret/digitalocean created
You can view the Secret object with the following command:
kubectl -n kube-system get secret digitalocean
The result will look something like this:
Output
NAME           TYPE      DATA      AGE
digitalocean   Opaque    1         41s
The Opaque type means that the Secret object is read-only, which is standard for Secret stringData objects. You can read more about these objects in the Specification for Secret objects. The DATA field displays the number of items stored in this Secret object. In this case it displays 1, because you have stored a single key.
Now that your Secret object has been created, install the DigitalOcean storage plug-in:
kubectl apply -f https://raw.githubusercontent.com/digitalocean/csi-digitalocean/master/deploy/kubernetes/releases/csi-digitalocean-v0.3.0.yaml
You will see approximately the following result:
Output
storageclass.storage.k8s.io/do-block-storage created
serviceaccount/csi-attacher created
clusterrole.rbac.authorization.k8s.io/external-attacher-runner created
clusterrolebinding.rbac.authorization.k8s.io/csi-attacher-role created
service/csi-attacher-doplug-in created
statefulset.apps/csi-attacher-doplug-in created
serviceaccount/csi-provisioner created
clusterrole.rbac.authorization.k8s.io/external-provisioner-runner created
clusterrolebinding.rbac.authorization.k8s.io/csi-provisioner-role created
service/csi-provisioner-doplug-in created
statefulset.apps/csi-provisioner-doplug-in created
serviceaccount/csi-doplug-in created
clusterrole.rbac.authorization.k8s.io/csi-doplug-in created
clusterrolebinding.rbac.authorization.k8s.io/csi-doplug-in created
daemonset.apps/csi-doplug-in created
Now that you have installed the DigitalOcean repository plugin, you can create a block repository to store your application code and configuration files.
Step 3 - Create permanent volume
After creating a Secret type object and installing the block storage plugin, you can create your own persistent volume. A Persistent Volume (PV) is a block storage volume of a given size that exists regardless of the lifecycle of the submission. Using a persistent volume allows you to manage or update pods without worrying about losing application code. The persistent volume can be accessed using PersistentVolumeClaim, or PVC, which mounts the persistent volume to the required path.
Open the code_volume.yaml file in the editor:
nano code_volume.yaml
Give the PVC a code name by adding the following parameters and values to the file:
apiVersion: v1
kind: PersistentVolumeClaim
metadata:
  name: code
The spec for PVC contains the following elements:
- accessModes, the value of which may vary depending on the use case. The options are as follows:
- ReadWriteOnce - mounts volume for reading and writing with one node
- ReadOnlyMany - mounts a read-only volume with many nodes
- ReadWriteMany - mounts read and write volume with many nodes
- Resources - space for the storage you need
DigitalOcean block storage is only mounted on one node, so accessModes must be set to ReadWriteOnce. In this tutorial you will be adding a small amount of application code, so in our case 1GB will suffice. If you plan to store more code or data in the volume, you can modify the storage parameter to suit your needs. You can increase the storage size after creating the volume, but shrinking the disk is not supported.
...
spec:
  accessModes:
  - ReadWriteOnce
  resources:
    requests:
      storage: 1Gi
Next, specify the storage class that Kubernetes will use to provision the volumes. You will use the do-block-storage class created by the DigitalOcean block storage plugin.
...
  storageClassName: do-block-storage
Your code_volume.yaml file will look like this:
apiVersion: v1
kind: PersistentVolumeClaim
metadata:
  name: code
spec:
  accessModes:
  - ReadWriteOnce
  resources:
    requests:
      storage: 1Gi
  storageClassName: do-block-storage
Save and close the file.
Create a code PersistentVolumeClaim using the kubectl command:
kubectl apply -f code_volume.yaml
The following output tells you that the object has been successfully created and you can mount your 1GB PVC as a volume.
Output
persistentvolumeclaim/code created
To view available persistent volumes (PVs):
kubectl get pv
You will see the permanent volumes listed:
Output
NAME                                       CAPACITY   ACCESS MODES   RECLAIM POLICY   STATUS    CLAIM          STORAGECLASS       REASON    AGE
pvc-ca4df10f-ab8c-11e8-b89d-12331aa95b13   1Gi        RWO            Delete           Bound     default/code   do-block-storage             2m
The fields above are an overview of the configuration file, except for the Reclaim Policy and Status parameters. The Reclaim Policy parameter defines what will be done to the PV after access is removed by the PVC. The Delete value removes the PV from Kubernetes as well as from the DigitalOcean infrastructure. You can get more information about the Reclaim Policy and Status settings in the Kubernetes PV documentation.
You have successfully created a persistent volume using the DigitalOcean block storage plugin. Now that your persistent volume is ready, you can create your pods using Deployment.
Step 4 - Create Deployment of PHP-FPM
In this step you will learn how to use Deployment to create your PHP-FPM submission. Deployments provide a consistent way to create, update, and manage pods using ReplicaSets. If the update does not work as expected, Deployment will automatically revert your pods back to the previous image.
The spec.selector key for Deployment will contain a list of labeled pods to manage. We will also use the template key to create the required pods.
In addition, in this step we will introduce the use of Init containers. Init-containers run one or more commands before the normal containers specified in the template key are run. In this tutorial, your Init container will get an example index.php file from GitHub Gist using wget. Here is what the contents of the example file look like:
Output
NAME                                       CAPACITY   ACCESS MODES   RECLAIM POLICY   STATUS    CLAIM          STORAGECLASS       REASON    AGE
pvc-ca4df10f-ab8c-11e8-b89d-12331aa95b13   1Gi        RWO            Delete           Bound     default/code   do-block-storage             2m
To create the deployment, open a new file named php_deployment.yaml in your editor:
nano php_deployment.yaml
This deployment will manage your PHP-FPM pods, so you must use a php name for the Deployment object. The pods belong to the backend tier, so you must merge the deployment into this group using the tag tier: backend:
apiVersion: apps/v1
kind: Deployment
metadata:
  name: php
  labels:
    tier: backend
For the spec deployment item you will need to specify how many instances of this feed should be created using the replicas parameter. The value of the replicas parameter will vary depending on your needs and available resources. In this tutorial we will create one replica:
apiVersion: apps/v1
kind: Deployment
metadata:
  name: php
  labels:
    tier: backend
This deployment will manage the pods labelled app: php and tier: backend. Next to the selector key add:
...
  selector:
    matchLabels:
      app: php
      tier: backend
Next, for the spec element, you must set the template value to define the object of your pitch. This template defines the specifications from which the pod is created. First, you need to add the labels that were specified for selectors service php and matchLabels deployment. Add app: php and tier: backend to template.metadata.labels:
...
  template:
    metadata:
      labels:
        app: php
        tier: backend
The Pod can have multiple containers and volumes, but each will require a name. You can selectively mount volumes in a container by specifying a path for each volume.
First, specify the volumes to which your containers will be mounted. You have created a PVC named code to store application code, so you must give this volume a similar name to code. In spec.template.spec.volumes add the following:
...
    spec:
      volumes:
      - name: code
        persistentVolumeClaim:
          claimName: code
Then specify the container you want to run in this pod. You can find different images in the Docker shop, but in this guide we will use the php:7-fpm image.
Under spec.template.spec.containers add the following:
...
      containers:
      - name: php
        image: php:7-fpm
Now you need to mount the volumes the container needs access to. This container will be running your PHP code, so it will need access to that code volume. You will also use mountPath to set /code as the mount point.
In spec.template.spec.containers.volumeMounts add:
...
        volumeMounts:
        - name: code
          mountPath: /code
Now that you have mounted your volume, you need to put the application code into the volume. You may have previously used FTP/SFTP or cloned the code over an SSH connection to achieve this, but at this point we'll show you how to copy the code using an initContainer.
Depending on the complexity of the setup process, you can either use one initContainer to run the script that builds your application, or one initContainer for each command. Make sure that volumes are mounted in the initContainer.
In this tutorial you will use one initContainer with busybox to load code. busybox is a small image containing the wget utility you will use for this purpose.
In spec.template.spec add your initContainer and specify busybox image:
...
      initContainers:
      - name: install
        image: busybox
Your InitContainer will need access to the code volume in order to perform a code load in that location. In spec.template.spec.initContainers, mount the code volume on the /code path:
...
        volumeMounts:
        - name: code
          mountPath: /code
For each Init-container you need to run a command. Your Init container will use wget to upload code from Github to the working directory /code. The -O parameter gives the uploaded file a name and you will need to name this file index.php.
Note: Be sure to check the code you are uploading. Check the source code before uploading it to the server to make sure the code is not doing anything you might not like.
For the install container in spec.template.spec.initContainers add the following lines:
...
        command:
        - wget
        - "-O"
        - "/code/index.php"
        - https://raw.githubusercontent.com/do-community/php-kubernetes/master/index.php
Your finished php_deployment.yaml file will look like this
apiVersion: apps/v1
kind: Deployment
metadata:
  name: php
  labels:
    tier: backend
spec:
  replicas: 1
  selector:
    matchLabels:
      app: php
      tier: backend
  template:
    metadata:
      labels:
        app: php
        tier: backend
    spec:
      volumes:
      - name: code
        persistentVolumeClaim:
          claimName: code
      containers:
      - name: php
        image: php:7-fpm
        volumeMounts:
        - name: code
          mountPath: /code
      initContainers:
      - name: install
        image: busybox
        volumeMounts:
        - name: code
          mountPath: /code
        command:
        - wget
        - "-O"
        - "/code/index.php"
        - https://raw.githubusercontent.com/do-community/php-kubernetes/master/index.php
Save the file and exit the editor.
Create a PHP-FPM deployment using kubectl:
kubectl apply -f php_deployment.yaml
You will see the following result of the deployment:
Output
deployment.apps/php created
Eventually this deployment will start loading the specified images. It will then request PersistentVolume from PersistentVolumeClaim and sequentially start your initContainers. Once complete, the containers will start and mount volumes to the specified mount point. Once all of these steps are complete, your pod will be ready to run and start up.
You can view your deployment using the following command:
kubectl get deployments
The result will look like this:
Output
NAME      DESIRED   CURRENT   UP-TO-DATE   AVAILABLE   AGE
php       1         1         1            0           19s
This output will help you understand the current status of your deployment. Deployment is one of the controllers that maintains the desired state. The pattern you created indicates that the DESIRED state will have 1 replica filename in php. The CURRENT field indicates how many replicas are running, so this data should match the DESIRED state data. You can read more data in the Kubernetes deployment documentation.
Use the following command to view the pods running this deployment:
kubectl get pods
The output of this command varies depending on how much time has passed since the deployment was created. If you ran it immediately after it was created, the output will look like this:
Output
NAME                   READY     STATUS     RESTARTS   AGE
php-86d59fd666-bf8zd   0/1       Init:0/1   0          9s
The columns represent the following information:
- Ready: number of replicas running under.
- Status: the state of the feed. Init indicates that the Init-containers are running. In this output 0 out of 1 Init containers have stopped running.
- Restarts: how many times this process has been restarted to start the pod. This number will be incremented if any of your Init containers stops running. The deployment will restart until the desired state is reached.
Depending on the complexity of your startup scripts it may take several minutes for the state to change to podInitializing:
Output
NAME                   READY     STATUS            RESTARTS   AGE
php-86d59fd666-lkwgn   0/1       podInitializing   0          39s
This means that the Init-container has finished and the containers are being initialised. If you run the command when all containers are running, you will see that the pod status has changed to Running.
Output
NAME                   READY     STATUS            RESTARTS   AGE
php-86d59fd666-lkwgn   1/1       Running   0          1m
You will now see that your pod has started successfully. If your pod has not been started, you can debug using the following commands:
View detailed information about the pod:
kubectl describe pods pod-name
View the logs generated by the pod:
kubectl logs pod-name
View the logs for a specific container in the pod:
kubectl logs pod-name container-name
Your application code has been mounted and the PHP-FPM service is ready to handle connections. You can now create an Nginx deployment.
Step 5 - Create Nginx Deployment
In this step, you will use ConfigMap to configure Nginx. ConfigMap stores your configuration in a key-value format, and you can refer to it in other Kubernetes object definitions. This approach will provide the ability to reuse the image or switch the image to a different version of Nginx if needed. The ConfigMap update will automatically reproduce the changes for any feed that mounts it.
Create an nginx_configMap.yaml file for ConfigMap in your editor:
nano nginx_configMap.yaml
Name ConfigMap nginx-config and add it to the microservices group tier: backend:
apiVersion: v1
kind: ConfigMap
metadata:
  name: nginx-config
  labels:
    tier: backend
You will then have to add the data for ConfigMap. Give the key a name config and add the contents of the Nginx configuration file as a value. You can use the Nginx configuration example in this guide.
As Kubernetes can redirect requests to the appropriate host for the service, you can enter the PHP-FPM service name for the fastcgi_pass parameter instead of its IP address. Add the following to the nginx_configMap.yaml file
...
data:
  config : |
    server {
      index index.php index.html;
      error_log  /var/log/nginx/error.log;
      access_log /var/log/nginx/access.log;
      root ^/code^;

      location / {
          try_files $uri $uri/ /index.php?$query_string;
      }

      location ~ .php$ {
          try_files $uri =404;
          fastcgi_split_path_info ^(.+.php)(/.+)$;
          fastcgi_pass php:9000;
          fastcgi_index index.php;
          include fastcgi_params;
          fastcgi_param SCRIPT_FILENAME $document_root$fastcgi_script_name;
          fastcgi_param PATH_INFO $fastcgi_path_info;
        }
    }
Your nginx_configMap.yaml file will look like this:
apiVersion: v1
kind: ConfigMap
metadata:
  name: nginx-config
  labels:
    tier: backend
data:
  config : |
    server {
      index index.php index.html;
      error_log  /var/log/nginx/error.log;
      access_log /var/log/nginx/access.log;
      root /code;

      location / {
          try_files $uri $uri/ /index.php?$query_string;
      }

      location ~ .php$ {
          try_files $uri =404;
          fastcgi_split_path_info ^(.+.php)(/.+)$;
          fastcgi_pass php:9000;
          fastcgi_index index.php;
          include fastcgi_params;
          fastcgi_param SCRIPT_FILENAME $document_root$fastcgi_script_name;
          fastcgi_param PATH_INFO $fastcgi_path_info;
        }
    }
Save the file and exit the editor.
Create ConfigMap:
kubectl apply -f nginx_configMap.yaml
The result will look like this
Output
configmap/nginx-config created
You have completed the ConfigMap creation and can now build your Nginx deployment.
Start by opening a new nginx_deployment.yaml file in the editor:
nano nginx_deployment.yaml
Name the nginx deployment and add the tag tier: backend:
apiVersion: apps/v1
kind: Deployment
metadata:
  name: nginx
  labels:
    tier: backend
Specify that you need one replica in spec deployment. This deployment will manage the pods labeled app:nginx and tier:backend. Add the following parameters and values:
...
spec:
  replicas: 1
  selector:
    matchLabels:
      app: nginx
      tier: backend
Then add the feed template. You need to use the same labels you added for the selector.matchLabels deployment. Add the following:
...
  template:
    metadata:
      labels:
        app: nginx
        tier: backend
Allow Nginx access to the code PVC you created earlier. In spec.template.spec.volumes add:
...
    spec:
      volumes:
      - name: code
        persistentVolumeClaim:
          claimName: code
Pods can mount ConfigMap as a volume. Specifying a filename and a key will create a file with the contents as its value. To use ConfigMap, configure as path the name of the file where the contents of the key will be stored. You need to create a site.conf file from the config key. Under spec.template.spec.volumes add the following:
...
      - name: config
        configMap:
          name: nginx-config
          items:
          - key: config
            path: site.conf
Warning: if the file is not specified, the content of the key will overwrite the mountPath of the volume. This means that if the path is not explicitly specified, you will lose all content in the destination folder.
Then you will need to set up an image to create a serve. This guide will use the nginx:1.7.9 image for stability, but you can find other Nginx images in the Docker shop. Also, provide access to Nginx from port 80. In spec.template.spec add:
...
      containers:
      - name: nginx
        image: nginx:1.7.9
        ports:
        - containerPort: 80
Nginx and PHP-FPM require access to a file with the same path, so you must mount the code volume in /code:
...
        volumeMounts:
        - name: code
          mountPath: /code
The nginx:1.7.9 image will automatically load any configuration files in the /etc/nginx/conf.d directory. Mounting a config volume in this directory will create the file /etc/nginx/conf.d/site.conf. In volumeMounts add the following:
...
        - name: config
          mountPath: /etc/nginx/conf.d
Your nginx_deployment.yaml file will look like this:
apiVersion: apps/v1
kind: Deployment
metadata:
  name: nginx
  labels:
    tier: backend
spec:
  replicas: 1
  selector:
    matchLabels:
      app: nginx
      tier: backend
  template:
    metadata:
      labels:
        app: nginx
        tier: backend
    spec:
      volumes:
      - name: code
        persistentVolumeClaim:
          claimName: code
      - name: config
        configMap:
          name: nginx-config
          items:
          - key: config
            path: site.conf
      containers:
      - name: nginx
        image: nginx:1.7.9
        ports:
        - containerPort: 80
        volumeMounts:
        - name: code
          mountPath: /code
        - name: config
          mountPath: /etc/nginx/conf.d
Create a Nginx deployment:
kubectl apply -f nginx_deployment.yaml
The following output means that your deployment has been successfully created:
Output
deployment.apps/nginx created
Generate a list of your deployments using this command:
kubectl get deployments
You will see Nginx and PHP-FPM deployments:
Output
NAME      DESIRED   CURRENT   UP-TO-DATE   AVAILABLE   AGE
nginx     1         1         1            0           16s
php       1         1         1            1           7m
Generate a list of the pods that are managed by both deployments:
kubectl get pods
You will see the running pods:
Output
NAME                     READY     STATUS    RESTARTS   AGE
nginx-7bf5476b6f-zppml   1/1       Running   0          32s
php-86d59fd666-lkwgn     1/1       Running   0          7m
Now that all Kubernetes objects are active, you can visit the Nginx service in your browser.
Generate a list of running services:
kubectl get services -o wide
Get the external IP address for the Nginx service:
Output
NAME         TYPE        CLUSTER-IP      EXTERNAL-IP   PORT(S)    AGE       SELECTOR
kubernetes   ClusterIP   10.96.0.1               443/TCP    39m
nginx        ClusterIP   10.102.160.47   your_public_ip 80/TCP     27m       app=nginx,tier=backend
php          ClusterIP   10.100.59.238           9000/TCP   34m       app=php,tier=backend
In the browser, visit your server by typing http://your_public_ip in the address bar. You will see php_info() output, which serves as confirmation that your Kubernetes services are up and running.
Ready!
In this guide, you have created a container for PHP-FPM and Nginx services so that you can manage them independently. This approach not only increases the scalability of your project as it grows, but also makes efficient use of resources. You've also stored the application code in a volume so that you can easily upgrade your services in the future.
Graceful shutdown in NGINX and PHP-FPM
A typical condition when implementing CI/CD in Kubernetes: an application must be able to not accept new client requests before a full shutdown, and most importantly, successfully terminate existing ones.
This condition allows for zero downtime during deplugging. However, even with very popular bundles (like NGINX and PHP-FPM) you may encounter some difficulties, that lead to error spikes with every single Deploy...
Theory. How the pod lives
In the context of this article we are interested in the following: the moment the pod enters Terminating state new requests are no longer sent to the pod (the pod is removed from the endpoints list for the service). This way we can avoid downtime during the deploat, just solve the application stopping correctly on our side.
Keep in mind that the default grace period is 30 seconds: after this the pod will be terminated and the application should have enough time to handle all the requests before this period. Note: although any request which lasts more than 5-10 seconds is already problematic and a graceful shutdown will not help it...
To get a better understanding of what happens when the pod shuts down just study the following diagram:
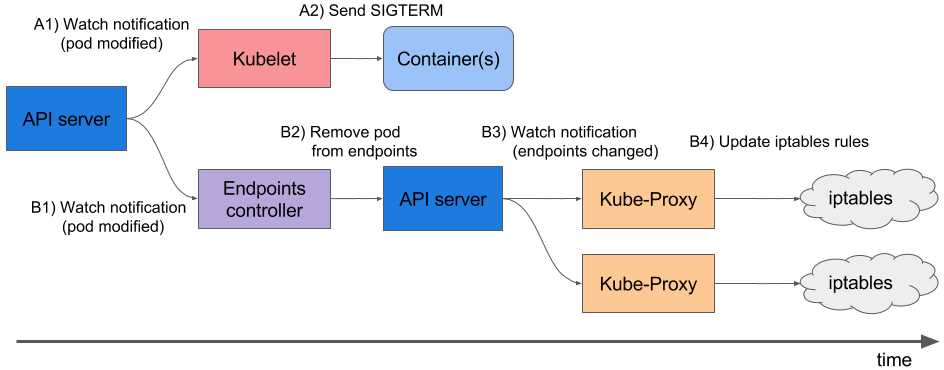
- A1, B1 - Receive status change of pod
- A2 - Send SIGTERM
- B2 - Remove pod from endpoints
- B3 - Receive change (endpoints list has changed)
- B4 - Updating of iptables rules
Note that the removal of the endpoint pod and the sending of the SIGTERM do not happen sequentially but in parallel. Because Ingress does not get the updated endpoints list immediately, new requests from clients will be sent to the pod which in turn causes 500 errors during the pod termination. This can be handled in the following ways:
Send Connection: close in the response headers (if this applies to an HTTP application).
If there's no way to modify the code, the following article describes a solution to handle requests until the end of the request period.
How NGINX and PHP-FPM terminate their processes
NGINX
Let's start with NGINX because it's more or less obvious. Theoretically we learn that NGINX has one master process and several "wrappers" - the child processes which handle client requests. A convenient feature is to use nginx -s <SIGNAL> command to shutdown the processes either in fast shutdown mode or in graceful shutdown mode. Obviously, we are interested in graceful shutdown.
The rest is simple: we just need to add a command to the preStop-hook which will send a graceful shutdown signal. This can be done in Deployment, in the container block:
       lifecycle:
          preStop:
            exec:
              command:
              - /usr/sbin/nginx
              - -s
              - quit
At the moment when pod is shutting down we will see the following in the NGINX logs:
And this is exactly what we want: NGINX waits for the requests to finish and then kills the process. However, we will still discuss a common problem below, which causes the process to terminate incorrectly even with the nginx -s quit command.
At this point we're done with NGINX: at least the logging shows it is working properly.
What about PHP-FPM? How does it handle graceful shutdown? Let's find out.
PHP-FPM
In the case of PHP-FPM, the information is a bit less detailed. If you refer to the official PHP-FPM manual, it will tell you that the following POSIX signals are accepted:
- SIGINT, SIGTERM - fast shutdown;
- SIGQUIT - graceful shutdown (which is what we need).
The other signals are not needed in this task, so we will skip their discussion. For the correct shutdown of the process we need to write the following preStop-hook:
2022/10/25 13:58:31 [notice] 1#1: signal 3 (SIGQUIT) received, shutting down
2022/10/25 13:58:31 [notice] 11#11: gracefully shutting down
At first glance, this seems to be all that is required to execute a graceful shutdown on both containers. However, the task is harder than it looks. Here are two cases where graceful shutdown didn't work and caused the project to be momentarily unavailable during the deploat.